Introduction to Microservices
Benefits
-
Each component in the platform can be delivered and upgraded separately.
-
Each component in the platform can also be scaled out to multiple servers independently
Challenges
- Many small components that use synchronous communication can cause a chain of failure problem, especially under high load.
- Keeping the configuration consistent and up to date in all the instances
- Monitoring the state of the platform in terms of latency issues and hardware usage was more complicated
- Collecting log files and correlating related log events from the components was also difficult.
microservice must fulfill certain criteria
- It must conform to a shared-nothing architecture; that is, microservices don’t share data in databases with each other!
- It must only communicate through well-defined interfaces, for example, using synchronous services or preferably by sending messages to each other using APIs and message formats that are stable, well-documented, and evolve by following a defined versioning strategy.
- It must be deployed as separate runtime processes. Each instance of a microservice runs in a separate runtime process, for example, a Docker container.
- Microservice instances are stateless so that incoming requests to a microservice can be handled by any of its instances.
How big should a microservice be?
- Small enough to fit in the head of a developer
- Big enough to not jeopardize performance (that is, latency) and/or data consistency (SQL foreign keys between data that’s stored in different microservices are no longer something you can take for granted)
Design patterns for microservices
Service discovery
-
The problem
Microservices instances are typically assigned dynamically allocated IP addresses, how can clients find microservices and their instances?
-
A solution
a service discovery service keeps track of currently available microservices and the IP addresses of its instances.
-
Requirements for the solution
Automatically register/unregister microservices
The request will be routed to one of the microservices available instances.
Requests to a microservice must be load-balanced over the available instances.
We must be able to detect instances that are not currently healthy; that is, requests will not be routed to them.
This design pattern can be implemented using two different strategies: Client-side routing or Server-side routing
Edge server
-
The problem
It is in many cases desirable to expose some of the microservices to the outside and hide the remaining microservices from external access. The exposed microservices must be protected against requests from malicious clients.
-
A solution
all incoming requests will go through an Edge Server, Implementation notes: An edge server typically behaves like a reverse proxy and can be integrated with a discovery service to provide dynamic load balancing capabilities.
-
Requirements for the solution
Hide internal services that should not be exposed outside their context; that is, only route requests to microservices that are configured to allow external requests.
Expose external services and protect them from malicious requests; that is, use standard protocols and best practices such as OAuth, OIDC, JWT tokens, and API keys to ensure that the clients are trustworthy.
Reactive microservices
-
The problem
we are used to implementing synchronous communication using blocking I/O, for example, a RESTful JSON API over HTTP. a server might run out of available threads in the operating system, causing problems ranging from longer response times to crashing servers.
overusing blocking I/O can make a system of microservices prone to errors which is also known as a chain of failures.
-
A solution
Use non-blocking I/O to ensure that no threads are allocated while waiting for processing to occur in another service, that is, a database or another microservice.
-
Requirements for the solution
Whenever feasible, use an asynchronous programming model; that is, send messages without waiting for the receiver to process them.
If a synchronous programming model is preferred, ensure that reactive frameworks are used that can execute synchronous requests using non-blocking I/O, that is, without allocating a thread while waiting for a response. This will make the microservices easier to scale in order to handle an increased workload.
Microservices must also be designed to be resilient, that is, capable of producing a response, even if a service that it depends on fails. Once the failing service is operational again, its clients must be able to resume using it, which is known as self-healing.
Central configuration
-
The problem
How do I get a complete picture of the configuration that is in place for all the running microservice instances?
How do I update the configuration and make sure that all the affected microservice instances are updated correctly?
-
A solution
a configuration server to store the configuration of all the microservices.
-
Requirements for the solution
Make it possible to store configuration information for a group of microservices in one place, with different settings for different environments (for example, dev, test, qa, and prod).
Centralized log analysis
-
The problem
How do I find out if any of the microservice instances get into trouble and start writing error messages to their log files?
If end users start to report problems, how can I find related log messages; that is, how can I identify which microservice instance is the root cause of the problem?
-
A solution
Add a new component that can manage centralized logging and is capable of the following:
- Detecting new microservice instances and collecting log events from them
- Interpreting and storing log events in a structured and searchable way in a central database
- Providing APIs and graphical tools for querying and analyzing log events
-
Requirements for the solution
Distributed tracing
-
The problem
If end users start to file support cases regarding a specific failure, how can we identify the microservice that caused the problem, that is, the root cause?
If one support case mentions problems related to a specific entity, for example, a specific order number, how can we find log messages related to processing this specific order
-
A solution
To track the processing between cooperating microservices, we need to ensure that all related requests and messages are marked with a common correlation ID and that the correlation ID is part of all log events. Based on a correlation ID, we can use the centralized logging service to find all related log events.
-
Requirements for the solution
Assign unique correlation IDs to all incoming or new requests and events in a well-known place, such as a header with a recognized name.
When a microservice makes an outgoing request or sends a message, it must add the correlation ID to the request and message.
All log events must include the correlation ID in a predefined format so that the centralized logging service can extract the correlation ID from the log event and make it searchable.
Circuit Breaker
-
The problem
A system landscape of microservices that uses synchronous intercommunication can be exposed to a chain of failure. If one microservice stops responding, its clients might get into problems as well and stop responding to requests from their clients. The problem can propagate recursively throughout a system landscape.
-
A solution
Add a Circuit Breaker that prevents new outgoing requests from a caller if it detects a problem with the service it calls.
-
Requirements for the solution
- Open the circuit and fail fast (without waiting for a timeout) if problems with the service are detected.
- Probe (探针) for failure correction (also known as a half-open circuit); that is, allow a single request to go through on a regular basis to see if the service operates normally again.
- Close the circuit if the probe detects that the service operates normally again. This capability is very important since it makes the system landscape resilient to these kinds of problems; that is, it self-heals.
all synchronous communication within the system landscape of microservices goes through Circuit Breakers. All the Circuit Breakers are closed; that is, they allow traffic, except for one Circuit Breaker detected problems in the service the requests go to.
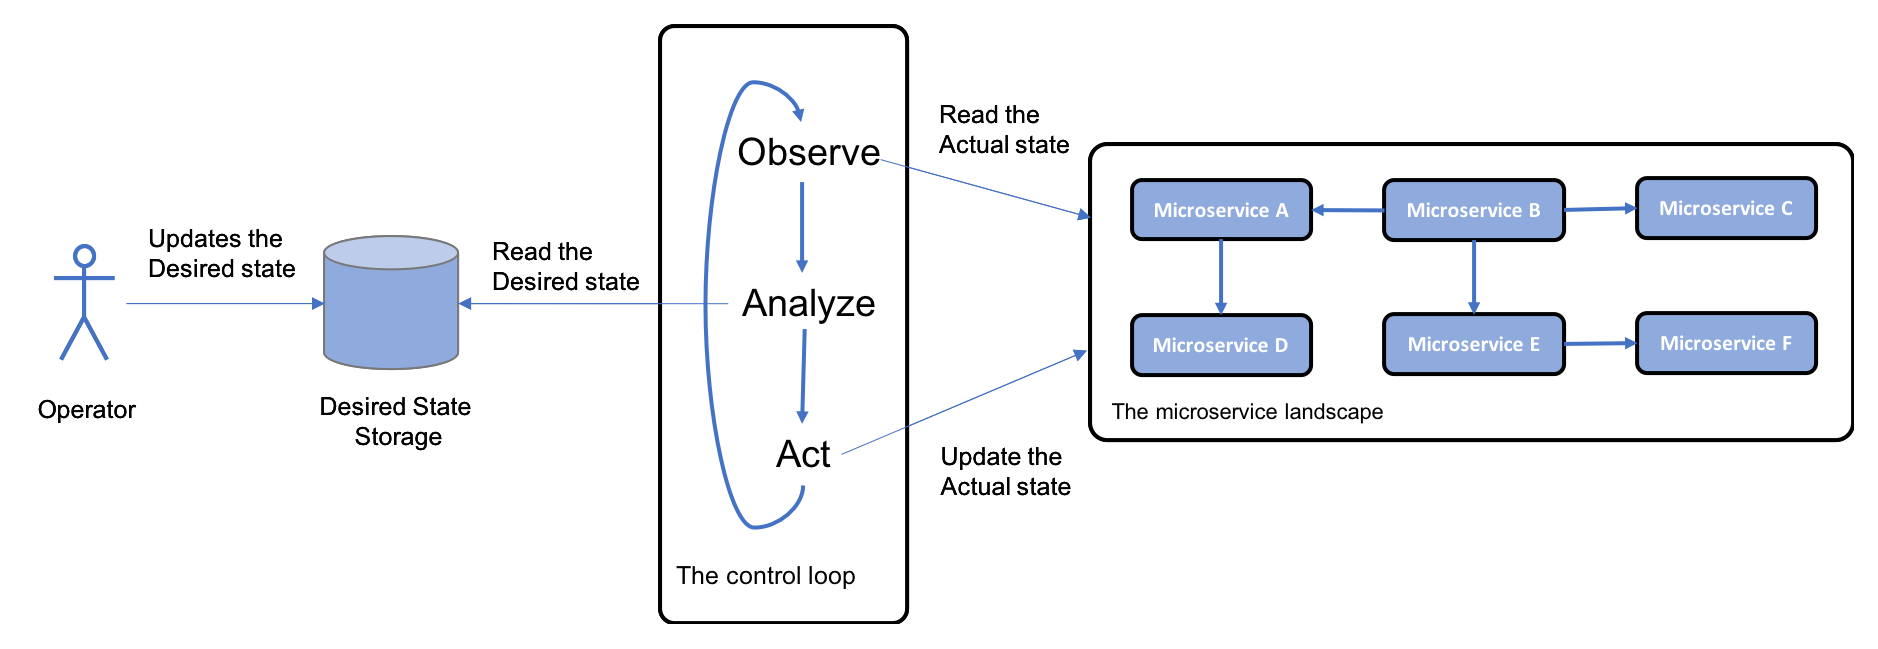
Control loop
-
The problem
In a system landscape with a large number of microservice instances spread out over a number of servers, it is very difficult to manually detect and correct problems such as crashed or hung microservice instances.
-
A solution
Add a new component, a control loop, to the system landscape; this constantly observes the actual state of the system landscape; compares it with the desired state, as specified by the operators; and, if required, takes action.
-
Requirements for the solution
Implementation notes: In the world of containers, a container orchestrator such as Kubernetes is typically used to implement this pattern.
Centralized monitoring and alarms
-
The problem
If observed response times and/or the usage of hardware resources become unacceptably high, it can be very hard to discover the root cause of the problem.
-
A solution
Add a new component, a monitor service, which is capable of collecting metrics about hardware resource usage for each microservice instance level.
-
Requirements for the solution
- It must be able to collect metrics from all the servers that are used by the system landscape, which includes auto-scaling servers.
- It must be able to detect new microservice instances as they are launched on the available servers and start to collect metrics from them.
- It must be able to provide APIs and graphical tools for querying and analyzing the collected metrics.
Use Grafana visualizes metrics from Prometheus
Software enablers
| Design Pattern | Spring Boot | Spring Cloud | Kubernetes | Istio |
|---|---|---|---|---|
| Service discovery | Netflix Eureka and Netflix Ribbon | Kubernetes kube-proxy and service resources | ||
| Edge server | Spring Cloud and Spring Security OAuth | Kubernetes Ingress controller | Istio ingress gateway | |
| Reactive microservices | Spring Reactor and Spring WebFlux | |||
| Central configuration | Spring Config Server | Kubernetes ConfigMaps and Secrets | ||
| Centralized log analysis | Elasticsearch, Fluentd, and Kibana Note: Actually not part of Kubernetes but can easily be deployed and configured together with Kubernetes | |||
| Distributed tracing | Spring Cloud Sleuth and Zipkin | Jaeger | ||
| Circuit Breaker | Resilience4j | Outlier detection | ||
| Control loop | Kubernetes controller manager | |||
| Centralized monitoring and alarms | Grafana and Prometheus Note: Actually not part of Kubernetes |
Kiali, Grafana, and Prometheus |
Please note that Spring Cloud, Kubernetes, and Istio can be used to implement some design patterns, such as service discovery, edge server, and central configuration. We will discuss the pros and cons of using these alternatives later in this book.
Other important considerations
-
Importance of Dev/Ops: microservice architecture enables shorter delivery times and allows the continuous delivery of new versions. the teams also need to automate the delivery chain, that is, the steps for building, testing, packaging, and deploying the microservices to the various deployment environments. This is known as setting up a delivery pipeline
-
Decomposing a monolithic application into microservices: One of the most difficult and expensive decisions is how to decompose a monolithic application into a set of cooperating microservices. If this is done in the wrong way, you will end up with problems such as the following:
- Slow delivery
- Slow performance
- Inconsistent data
A good approach to finding proper boundaries for microservices is to apply Domain-Driven Design and its Bounded Context concept. According to Eric Evans, a Bounded Context is “A description of a boundary (typically a subsystem, or the work of a particular team) within which a particular model is defined and applicable.” This means that the microservice defined by a Bounded Context will have a well-defined model of its own data.
-
Importance of API design:
- the description in terms of the naming and data types used.
- It is of great importance that APIs are allowed to evolve in a controlled manner. This typically requires applying a proper versioning schema for the APIs, allowing clients of the API to migrate to new major versions at their own pace.
-
Migration paths from on-premise to the cloud: An appealing migration approach can be to first move the workload into Kubernetes on-premise (as microservices or not) and then redeploy it on a Kubernetes as a Service offering provided by a preferred cloud provider.
-
Good design principles for microservices, the 12-factor app: The 12-factor app (https://12factor.net) is a set of design principles for building software that can be deployed in the cloud.
Introduction to Spring Boot
We will develop microservices that contain business logic based on plain Spring Beans and REST APIs using Spring WebFlux, the Swagger/OpenAPI-based documentation of the REST APIs, and SpringFox and data persistence, while using Spring Data to store data in both SQL and NoSQL databases
-
plain Spring Beans, Spring WebFlux, Swagger, SpringFox, Spring Data
-
create reactive microservices in this chapter, including both non-blocking synchronous REST APIs and message-based asynchronous services
-
use Spring WebFlux to develop non-blocking synchronous REST APIs and Spring Cloud Stream to develop message-based asynchronous services.
Learning about Spring Boot
Spring Boot does that by applying a number of conventions by default, minimizing the need for configuration. Whenever required, each convention can be overridden by writing some configuration, case by case. Configuration, when required, is in my opinion written best using Java and annotations.
A fat JAR file contains not only the classes and resource files of the application itself, but also all the .jar files the application depends on. This means that the fat JAR file is the only JAR file required to run the application.
Starting a fat JAR requires no separately installed Java EE web server, such as Apache Tomcat. Instead, it can be started with a simple command such as java -jar app.jar, making it a perfect choice for running in a Docker container!
Component scanning
-
Let’s assume we have the following Spring component in the package of the application class (or in one of its sub-packages):
1
2
@Component public class MyComponentImpl implements MyComponent { ...Another component in the application can get the component automatically injected, also known as auto-wiring, using the
@Autowiredannotation:1 2 3 4 5 6 7 8public class AnotherComponent { private final MyComponent myComponent; @Autowired public AnotherComponent(MyComponent myComponent) { this.myComponent = myComponent; }I prefer using constructor injection (over field and setter injection) to keep the state in my components immutable. The immutable state is important if you want to be able to run the component in a multithreaded runtime environment.
-
If we want to use components that are declared in a package outside the applications package, for example, a utility component shared by multiple Spring Boot applications, we can complement the @SpringBootApplication annotation in the application class with a
@ComponentScanannotation:1 2 3 4 5package se.magnus.myapp; @SpringBootApplication @ComponentScan({"se.magnus.myapp","se.magnus.utils"}) public class MyApplication {We can now auto-wire components from the se.magnus.util package in the application code, for example, a utility component, as follows:
1 2 3 4package se.magnus.utils; @Component public class MyUtility { ...This utility component can be auto-wired in an application component like so:
1 2 3 4 5 6 7 8 9 10package se.magnus.myapp.services; public class AnotherComponent { private final MyUtility myUtility; @Autowired public AnotherComponent(MyUtility myUtility) { this.myUtility = myUtility; }
Java-based configuration
If we want to override Spring Boot’s default configuration or if we want to add our own configuration, we can simply annotate a class with @Configuration. for example:
|
|
Reactive non-blocking synchronous REST services with Spring WebFlux.
Spring Framework uses Project Reactor as the base implementation of its reactive support, and also comes with a new web framework, Spring WebFlux, which supports the development of reactive, that is, non-blocking, HTTP clients and services.
Spring WebFlux supports running on a servlet container, but also supports reactive non-servlet-based embedded web servers such as Netty.
The Spring WebFlux starter dependency will be added to the build.gradle file. It looks like this:
|
|
When the microservice is started up, Spring Boot will detect Spring WebFlux on the classpath and configure it, then start up an embedded web server, Netty is used by default,
If we want to switch from Netty to Tomcat as our embedded web server, we can override the default configuration by excluding Netty from the starter dependency and add the starter dependency for Tomcat:
|
|
Spring Boot application property files can either be a .properties file or a YAML file. By default, they are named application.properties and application.yml, respectively. Avoid port collisions with other microservices running on the same server, add the following line to the application.yml file:
|
|
Sample RestController
|
|
Swagger and OpenAPI-based documentation with SpringFox
SpringFox is an open-source project, separate from the Spring Framework, that can create Swagger-based API documentation at runtime. It does so by examining the application at startup, for example, inspecting WebFlux and Swagger-based annotations.
Persistent data with Spring Data
Spring Data comes with a common programming model for persisting data in various types of database engine, ranging from traditional relational databases (SQL databases) to various types of NoSQL database engine, such as document databases (for example, MongoDB), key-value databases (for example, Redis), and graph databases (for example, Neo4J).
The Spring Data project is divided into several subprojects and in this book we will use Spring Data subprojects for MongoDB and JPA that have been mapped to a MySQL database.
The two core concepts of the programming model in Spring Data are entities and repositories. Entities and repositories generalize how data is stored and accessed from the various types of database.
Entity
Entity classes are, in general, annotated with a mix of generic Spring Data annotations and annotations that are specific to each database technology.
For example, an entity that will be stored in a relational database can be annotated with JPA annotations such as the following:
|
|
If an entity is to be stored in a MongoDB database, annotations from the Spring Data MongoDB subproject can be used together with generic Spring Data annotations. For example, consider the following code:
|
|
Repositories
Repositories are used to store and access data from different types of database. In its most basic form, a repository can be declared as a Java interface.
Spring Data also comes with some base Java interfaces, for example, CrudRepository, to make the definition of a repository even simpler.
To specify a repository for handling the JPA entity, ReviewEntity, we only need to declare the following:
|
|
In this example we use a class, ReviewEntityPK, to describe a composite primary key. It looks as follows:
|
|
We have also added an extra method, findByProductId, which allows us to look up Review entities based on productId
If we want to use the repository, we can simply inject it and then start to use it, for example:
|
|
Spring Data also provides a reactive base interface, ReactiveCrudRepository, which enables reactive repositories. The methods in this interface do not return objects or collections of objects; instead, they return Mono and Flux objects.
The reactive-based interface can only be used by Spring Data subprojects that support reactive database drivers; that is, they are based on non-blocking I/O. The Spring Data MongoDB subproject supports reactive repositories, while Spring Data JPA does not.
|
|
Message-based asynchronous services with Spring Cloud Stream
Spring Cloud Stream provides a streaming abstraction over messaging, based on the publish-and-subscribe integration pattern. Spring Cloud Stream currently comes with support for Apache Kafka and RabbitMQ out of the box. A number of separate projects exist that provide integration with other popular messaging systems. See https://github.com/spring-cloud?q=binder for more details.
The core concepts in Spring Cloud Stream are as follows:
- Message: A data structure that’s used to describe data sent to and received from a messaging system.
- Publisher: Sends messages to the messaging system.
- Subscriber: Receives messages from the messaging system.
- Channel: Used to communicate with the messaging system. Publishers use output channels and subscribers use input channels.
- Binder: A binder provides the actual integration with a specific messaging system, similar to what a JDBC driver does for a specific type of database.
examples
Let’s assume that we have a simple message class such as the following (constructors, getters, and setters have been left out for improved readability):
|
|
Spring Cloud Stream comes with default input and output channels, Sink and Source, so we don’t need to create our own to get started. To publish a message, we can use the following source code:
|
|
To receive messages, we can use the following code:
|
|
To bind to RabbitMQ, we will use a dedicated starter dependency in the build file, build.gradle:
|
|
For the subscriber to receive messages from the publisher, we need to configure the input and output channel to use the same destination. If we use YAML to describe our configuration, it might look like the following for the publisher:
|
|
The configuration for the subscriber is as follows:
|
|
Learning about Docker
For example, we can write scripts in order to automate end-to-end tests of our microservice landscape. A test script can start up the microservice landscape, run tests using the exposed services, and tear down the landscape. This type of automated test script is very useful.
A build server can run these types of test in its continuous integration and deployment process whenever a developer pushes code to the source repository.
The following Dockerfile is all that is required to run the microservice as a Docker container
|
|
If we want to start and stop many containers with one command, Docker Compose is the perfect tool. Docker Compose uses a YAML file to describe the containers to be managed.
|
|
Creating a Set of Cooperating Microservices
Introducing the microservice landscape
the microservice-based system demo landscape

It consists of three core microservices, the Product, Review, and Recommendation services, all of which deal with one type of resource, and a composite microservice called the Product Composite service, which aggregates information from the three core services.
At this stage, we don’t have any service discovery mechanism in place, we will use hardcoded port numbers for each microservice.
- Product composite service: 7000
- Product service: 7001
- Review service: 7002
- Recommendation service: 7003
Information handled by microservices:
-
Product service
The product service manages product information and describes each product with the following attributes:
- Product ID
- Name
- Weight
-
Review service
The review service manages product reviews and stores the following information about each review:
- Product ID
- Review ID
- Author
- Subject
- Content
-
Recommendation service
The recommendation service manages product recommendations and stores the following information about each recommendation:
- Product ID
- Recommendation ID
- Author
- Rate
- Content
-
Product composite service
The product composite service aggregates information from the three core services and presents information about a product as follows:
- Product information, as described in the product service
- A list of product reviews for the specified product, as described in the review service
- A list of product recommendations for the specified product, as described in the recommendation service
-
Infrastructure-related information
Once we start to run our microservices as containers that are managed by the infrastructure (first Docker and later on Kubernetes), it will be of interest to track which container actually responded to our requests. To simplify this tracking, we have also added a serviceAddress attribute to all our responses, formatted as hostname/ip-address:port.
Generating skeleton microservices
Using Spring Initializr to generate skeleton code
To create skeleton code for our microservices, we need to run the following command for product-service:
|
|
Spring Boot Actuator enables a number of valuable endpoints for management and monitoring. We will see them in action later on. Spring WebFlux will be used here to create our RESTful APIs.
We can build each microservice separately with the following command:
|
|
Setting up multi-project builds in Gradle
-
create the settings.gradle file
1 2 3 4 5 6cat <<EOF > settings.gradle include ':microservices:product-service' include ':microservices:review-service' include ':microservices:recommendation-service' include ':microservices:product-composite-service' EOF -
copy the Gradle executable files that were generated from one of the projects so that we can reuse them for the multi-project builds:
1 2 3 4cp -r microservices/product-service/gradle . cp microservices/product-service/gradlew . cp microservices/product-service/gradlew.bat . cp microservices/product-service/.gitignore . -
no longer need the generated Gradle executable files in each project
1
2
find microservices -depth -name "gradle" -exec rm -rfv "{}" \; find microservices -depth -name "gradlew*" -exec rm -fv "{}" \; -
build all the microservices with one command
1./gradlew build
Adding RESTful APIs
Adding an API and a util project
add two projects (api and util) that will contain code that is shared by the microservice projects
It is debatable whether it is good practice to store API definitions for a group of microservices in a common API module. To me, it is a good choice for microservices that are part of the same delivery organization, that is, whose releases are governed by one and the same organization (compare to a Bounded Context in Domain-Driven Design, where our microservices are placed in one and the same bounded context).