Tutorials
Let’s go through a series of steps to create a simple React web application. We’ll start from scratch and build up a basic application.
Setting Up Environment
Install Node.js and npm
|
|
Managing packages with npm
|
|
|
|
|
|
|
|
|
|
|
|
Setting NPM Registry
|
|
|
|
Install Create React App
|
|
Creating a New React Application
Create a New React App (Method 1)
|
|
|
|
Creating a React App From Scratch (Method 2)
Create Project Directory
|
|
initialize the app with npm to manage all our dependencies
|
|
Content tracker using Git
|
|
|
|
|
|
Install Dependencies
|
|
Add Directory and Files
|
|
|
|
|
|
|
|
|
|
Configure Webpack and Babel
|
|
|
|
|
|
|
|
Add scripts to package.json
|
|
Run the Server
|
|
You should see your app running at http://localhost:8080/ in the browser.
Understanding the Project Structure
public: This directory contains the public assets of the application, including the index.html file.
src: This directory contains the source code of the application.
App.js: The main component of your application.index.js: The entry point of your application.
Creating Your First Component
Create a New Component:
In the src directory, create a new file called Hello.js.
Add the following code to Hello.js
|
|
Use the New Component
|
|
|
|
Adding State and Props
Adding State
Modify Hello.js to use state:
|
|
Adding Props
Modify App.js to pass props to Hello
|
|
Update Hello.js to receive and use props:
|
|
Adding Styling
Add CSS
Open App.css and add some styles:
|
|
Building for Production
Build the App
Run the following command to create a production build of your application:
|
|
This will create a build directory with the production-ready files.
Topic guides
JSX (JavaScript XML)
JSX is a syntax extension for JavaScript that looks similar to HTML. JSX allows you to write HTML elements directly within JavaScript.
|
|
Embedding JavaScript expressions within JSX by wrapping them in curly braces {}.
|
|
After compilation, JSX expressions become regular JavaScript function calls and evaluate to JavaScript objects. JSX elements can have attributes passed to the component as props.
|
|
You can use any JavaScript logic within JSX, such as conditionals and loops.
|
|
JSX is not valid JavaScript, so it needs to be transformed into standard JavaScript before it can be executed by the browser. This transformation is usually done by a tool like Babel.
Conditional Rendering
In React, you can conditionally render JSX using JavaScript syntax like if statements, &&, and ? : operators.
|
|
|
|
|
|
The Rules of JSX
-
Return a single root element
To return multiple elements from a component, wrap them with a single parent tag.
If you don’t want to add an extra
<div>to your markup, you can write<>and</>instead. -
Close all the tags
JSX requires tags to be explicitly closed: self-closing tags like
<img>must become<img />, and wrapping tags like<li>orangesmust be written as<li>oranges</li>. -
camelCase all most of the things!
JSX turns into JavaScript and attributes written in JSX become keys of JavaScript objects. But JavaScript has limitations on variable names. For example, their names can’t contain dashes or be reserved words. This is why, in React, many HTML and SVG attributes are written in camelCase.
1 2 3 4 5<img src="https://i.imgur.com/yXOvdOSs.jpg" alt="Hedy Lamarr" className="photo" />
If you have a lot of HTML to port to JSX, you can use an online converter.
Components
React components are regular JavaScript functions that return markup, their names must start with a capital letter. They encapsulate reusable pieces of the UI. Components can be functional or class-based. They can accept inputs called “props” and manage their own state.
|
|
Export the component
|
|
Using a component inside other components.
|
|
<Welcome /> starts with a capital W, so React knows that we want to use our component called Welcome.
Rendering lists
It is often necessary to display multiple similar components from a collection of data. JavaScript’s filter() and map() functions can be used with React to filter and transform an array of data into an array of components.
For each array item, a key needs to be specified. Usually, an ID from the database is used as a key.
|
|
|
|
The Render Tree
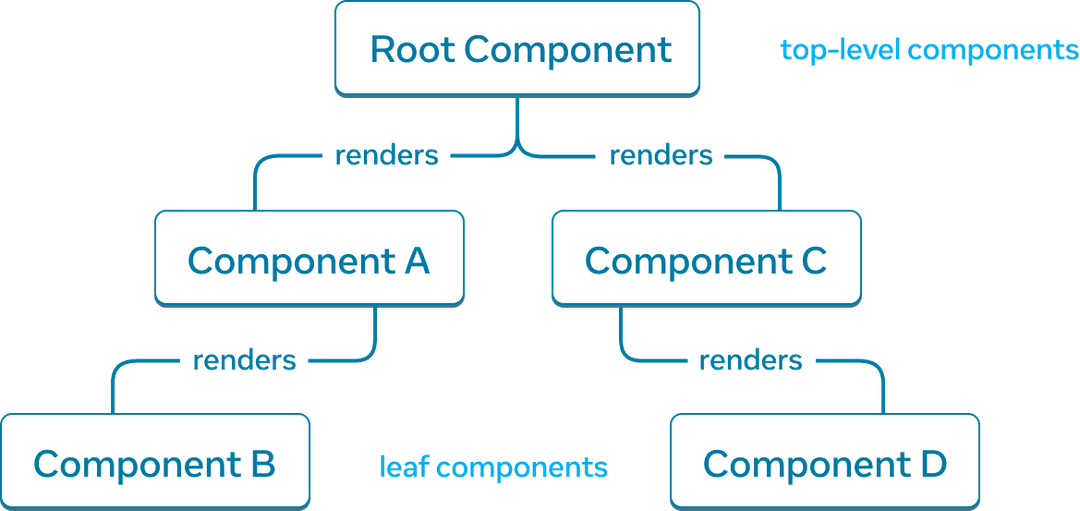
Components near the top of the tree, near the root component, are considered top-level components. Components with no child components are leaf components. This categorization of components is useful for understanding data flow and rendering performance.
The Module Dependency Tree

Dependency trees are useful to determine what modules are necessary to run your React app. When building a React app for production, there is typically a build step that will bundle all the necessary JavaScript to ship to the client. The tool responsible for this is called a bundler, and bundlers will use the dependency tree to determine what modules should be included.
- Webpack
- Vite
Props (Properties)
Props are inputs to a React component that allow data to be passed from one component to another.
- Props are read-only and cannot be modified by the component receiving them.
- They allow for dynamic rendering based on input data.
- Props can be any JavaScript value, including functions, objects, and arrays.
|
|
Pass props to the child component
|
|
If double curly braces after person= cause confusion, recall they simply represent an object inside the JSX curlies.
Read props inside the child component
|
|
Don’t miss the pair of { and } curlies inside of ( and ) when declaring props.
In fact, props are the only argument to your component! React component functions accept a single argument, a props object.
This syntax is called “destructuring” and is equivalent to reading properties from a function parameter:
|
|
Specifying a default value for a prop
|
|
Forwarding props with the JSX spread syntax
Use spread syntax with restraint. This forwards all of Profile’s props to the Avatar.
|
|
Passing JSX as children
For example, the Card component below will receive a children prop set to <Avatar /> and render it in a wrapper div:
|
|
Props are immutable
Props are immutable, don’t try to “change props”. When there is a need to respond to user input (such as changing the selected color), it is necessary to “set state”.
Events
Adding event handlers
Event handlers are custom functions that are triggered in response to interactions such as clicking, hovering, focusing on form inputs, and similar actions.
Define a function and then pass it as a prop to the appropriate JSX tag.
|
|
- Event handlers are usually defined inside your components.
- Event handlers have names that start with handle, followed by the name of the event.
Alternatively, you can define an event handler inline in the JSX:
|
|
Or, more concisely, using an arrow function:
|
|
Passing event handlers as props
Often the parent component will need to specify a child’s event handler. To accomplish this, pass a prop that the component receives from its parent as the event handler.
Functional Components
|
|
- The
ParentComponentdefines thehandleButtonClickfunction. - The
ChildComponentreceivesonButtonClickas a prop and attaches it to the button’sonClickevent.
Class Components
|
|
- The
ParentComponentdefines thehandleButtonClickmethod and binds it in the constructor. - The
ChildComponentreceivesonButtonClickas a prop and attaches it to the button’sonClickevent.
Event Propagation
Event Bubbling
Event bubbling is a type of event propagation where the event starts from the target element and bubbles up to its parent elements. In React, this is the default behavior for events.
|
|
The handleButtonClick function is called when the button is clicked, followed by handleParentClick due to bubbling.
Event Capturing
|
|
React onClickCapture is an event handler that gets triggered whenever an element is clicked. Similar to onClick, but the difference is that onClickCapture acts in the capture phase, whereas onClick acts in the bubbling phase, i.e., phases of an event.
Stopping propagation
|
|
Clicking the button will trigger handleButtonClick, but handleParentClick will not be triggered because stopPropagation() is called.
Preventing Default Behavior
|
|
- The
handleSubmitfunction is called when the form is submitted. preventDefault()is called to prevent the form from performing its default submit action.
State
State is a built-in object in React components that allows components to maintain and manage local data. Components need to “remember” things.
Why state is essential
When a regular variable isn’t enough:
- Local variables don’t persist between renders. When React renders this component a second time, it renders it from scratch—it doesn’t consider any changes to the local variables.
- Changes to local variables won’t trigger renders. React doesn’t realize it needs to render the component again with the new data.
To update a component with new data, two things need to happen:
- Retain the data between renders.
- Trigger React to render the component with new data (re-rendering).
The useState Hook provides those two things:
- A state variable to retain the data between renders.
- A state setter function to update the variable and trigger React to render the component again.
Adding a state variable
|
|
countis a state variable andsetCountis the setter function.- The
[and]syntax here is called array destructuring. - The only argument to
useStateis the initial value of your state variable.
State is isolated and private
State is local to a component instance. In other words, if the same component is rendered twice, each instance will have its own isolated state. Changes to the state of one instance will not affect the state of the other.
|
|
State as a Snapshot
State behaves more like a snapshot. Setting state does not directly modify the existing state variable but instead triggers a re-render of the component.
State should be treated as immutable. When updating state, always create a new state object rather than modifying the existing one.
Each time the state changes, the component re-renders, showing the new snapshot of the state variable. Setting state requests a new render.
|
|
A state variable’s value never changes within a render, even if its event handler’s code is asynchronous. Inside that render’s onClick, the value of number continues to be 0 even after setNumber(number + 5) was called.
React keeps the state values “fixed” within one render’s event handlers.
Queueing a Series of State Updates
React batches state updates
|
|
React waits until all code in the event handlers has run before processing your state updates.
Updating the same state multiple times before the next render
|
|
Here, n => n + 1 is called an updater function. React queues this function to be processed after all the other code in the event handler has run.
| queued update | n |
returns |
|---|---|---|
n => n + 1 |
0 |
0 + 1 = 1 |
n => n + 1 |
1 |
1 + 1 = 2 |
n => n + 1 |
2 |
2 + 1 = 3 |
React stores 3 as the final result and returns it from useState.
Mix 1
|
|
During the next render, React goes through the state queue:
| queued update | n |
returns |
|---|---|---|
”replace with 5” |
0 (unused) |
5 |
n => n + 1 |
5 |
5 + 1 = 6 |
React stores 6 as the final result and returns it from useState.
Mix 2
|
|
| queued update | n |
returns |
|---|---|---|
”replace with 5” |
0 (unused) |
5 |
n => n + 1 |
5 |
5 + 1 = 6 |
”replace with 42” |
6 (unused) |
42 |
Then React stores 42 as the final result and returns it from useState.
Naming conventions
It’s common to name the updater function argument by the first letters of the corresponding state variable:
|
|
If you prefer more verbose code, another common convention is to repeat the full state variable name, like setEnabled(enabled => !enabled), or to use a prefix like setEnabled(prevEnabled => !prevEnabled).
Updating Objects in State
So far you’ve been working with numbers, strings, and booleans. These kinds of JavaScript values are “immutable”, meaning unchangeable or “read-only”. You can trigger a re-render to replace a value.
State can hold any kind of JavaScript value, including objects. When updating an object, it is necessary to create a new object (or make a copy of an existing one) and then set the state to use that new object.
Treat state as read-only
Now consider an object in state:
|
|
However, although objects in React state are technically mutable, you should treat them as if they were immutable—like numbers, booleans, and strings. Instead of mutating them, you should always replace them.
To actually trigger a re-render in this case, create a new object and pass it to the state setting function:
|
|
Copying objects with the spread syntax
Often, it is necessary to include existing data as part of the new object being created. The ... object spread syntax can be used to avoid copying each property separately.
|
|
Note that the ... spread syntax is “shallow”—it only copies things one level deep. This makes it fast, but it also means that if you want to update a nested property, you’ll have to use it more than once.
Updating a nested object:
|
|
Or, written as a single function call:
|
|
Write concise update logic with Immer
If the state is deeply nested, it may be beneficial to consider flattening it. Immer is a popular library that allows for writing with a convenient but mutating syntax while handling the creation of copies automatically.
Updating Arrays in State
Arrays are mutable in JavaScript, but they should be treated as immutable when stored in state. Similarly to objects, when updating an array stored in state, it is necessary to create a new array (or make a copy of an existing one) and then set the state to use the new array.
Create a new array which contains the existing items and a new item at the end. There are multiple ways to do this, but the easiest one is to use the ... array spread syntax:
|
|
The array spread syntax also lets you prepend an item by placing it before the original ...artists:
|
|
Removing from an array
|
|
Transforming an array
|
|
Inserting into an array
|
|
Updating objects inside arrays
|
|
Write concise update logic with Immer
|
|
Lifecycle Methods
Lifecycle methods are special methods in class components that allow you to run code at specific points in a component’s lifecycle.
- Common lifecycle methods include
componentDidMount,componentDidUpdate, andcomponentWillUnmount. - They are used for side effects, such as fetching data, subscribing to events, or cleaning up resources.
|
|
Hooks
In React, useState, as well as any other function starting with “use”, is called a Hook.
Hooks are special functions that are only available while React is rendering.
Hooks are functions that let you use state and other React features in functional components.
- The most commonly used hooks are
useStateanduseEffect. - Hooks can only be used at the top level of functional components or custom hooks.
- They enable functional components to have state and side effects.
|
|
Context
Context provides a way to share values between components without passing props through every level of the tree.
- Useful for global settings, themes, or user authentication.
React.createContextcreates a context object.Context.ProviderandContext.Consumerare used to provide and consume the context value.
|
|
React Router
React Router is a library for handling navigation and routing in React applications.
- Enables single-page applications (SPA) by handling client-side routing.
- Provides components like
BrowserRouter,Route,Link, andSwitch. - Routes can be nested, dynamic, and parameterized.
|
|
Higher-Order Components (HOCs)
HOCs are advanced techniques in React for reusing component logic. They are functions that take a component and return a new component.
- HOCs can add functionality to existing components.
- They are often used for cross-cutting concerns like logging, authorization, and theming.
- Common HOCs include
withRouterfrom React Router andconnectfrom Redux.
|
|
Redux
Redux is a state management library commonly used with React to manage the global state of an application. If you want to keep state-specific to your HOC then use state. Now in the function component, we use useState. If you want to share data throughout the application use redux state. The Redux store is the database of front-end.
- It follows a unidirectional data flow and uses a central store.
- Actions and reducers are used to manage state changes.
- Middleware like
redux-thunkorredux-sagacan be used for handling side effects.
|
|